Shader Profiling & 診断
Shader Profiling & 診断
June, 2006
Shader Profiling
Shader profiling identifies hotspots in shaders, taking the guesswork out of optimization. Shader hotspots include call stacks, allowing a detailed understanding of the context in which heavily used library routines are called. Each hotspot is linked to its source code, simplifying browsing and analysis.
Profiling is enabled with the following RIB option, which specifies an output filename:
Option "statistics" "shaderprofile" ["profile.xml"]
When profiling is enabled, single-threaded rendering should be used to ensure accurate timing, i.e. using "prman -t:1"
The impact on execution time and memory is modest. Profiling typically increases overall time by less than 5% and uses a few hundred kilobytes per shader.
Important
Shaders compiled with older versions of the shader compiler (pre-13) will not be profiled. The output of the profiler includes a list of any shaders that require recompilation.
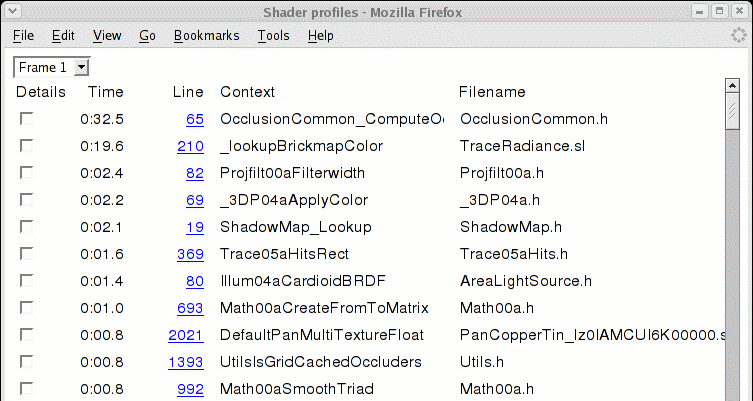
Viewing Hotspots
The output file is XML, which is linked to a stylesheet. Simply load the file in a Web browser to browse the results. The profiling results contain a list of shading hotspots, each of which includes the elapsed time, source filename and line number, and the name of the calling function.
If problems arise, try the following:
Make sure JavaScript is enabled.
The output file contains an <xml-stylesheet> tag that specifies the location of a stylesheet. Sometimes the Web browser is unable to locate the stylesheet. This commonly occurs if the statistics are generated on a renderfarm but viewed on workstation that does not have the stylesheet in the same location.
A simple workaround is to edit the output file to specify the correct location of the stylesheet, which is normally located in $RMANTREE/etc/html where $RMANTREE is the location of the RenderMan installation directory. The current stylesheet filename is rmProfileHtml_1.0.xml, but subsequent releases will likely use a different version number.
Alternatively, the location of the stylesheet can be specified in the rendermn.ini configuration file, which is located in the etc subdirectory of the RenderMan installation directory. Administrators of large installations may find it convenient to copy the stylesheet to a central location (e.g. a Web server) and update rendermn.ini to reference that location:
/prman/statistics/profilestylesheet http://megacorp.com/render/profileStyle.xml
However, beware that "cross-domain security" features in some browsers do not permit an XML file to use a stylesheet in a different domain (e.g. if the XML is loaded from the local filesystem, the stylesheet cannot be loaded from a web server).
If necessary, an offline processor can be used to convert the XML file to HTML using the profiling stylesheet. This allows profiling results to be viewed in Opera and older versions of other Web browsers. To perform this conversion, use a command-line XSLT processor like xsltproc, which is distributed with libxslt (xmlsoft.org/XSLT). See the XSLT FAQ for other tools.
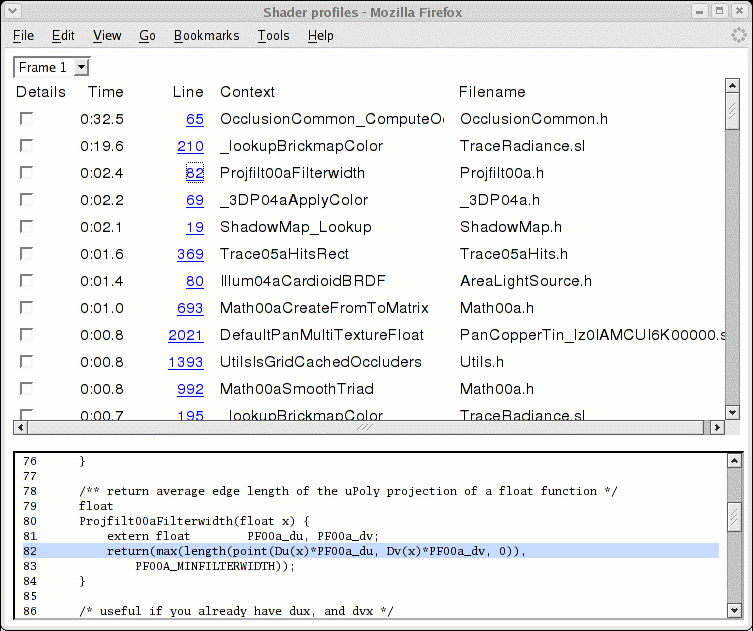
Browsing Source Code
Simply click on the line number of a hotspot to inspect its source code:
Filesystem issues can complicate source code browsing. The full path to each source file (including header files) is recorded when a shader is compiled. If those paths are not valid on the computer where the results are viewed, source browsing is not possible. A simple workaround is to search-and-replace directory names in the profiler output file.
Other issues may arise:
Make sure JavaScript is enabled.
Mysteriously, some browsers will not load source code that starts with "#define". (This is probably a relic of Unix file type conventions.) Simply add a comment to the start of such files and try again.
Line numbers in the source code browser are sometimes off by one. This is due to a browser bug that discards the first blank line of any text file. The source code browser provides a button to adjust for this quirk. Or simply edit such files to eliminate leading blank lines.
Some browsers will not load files with unknown filename extensions (such as ".sl"). It might be possible to work around such issues by changing MIME types or file associations. For example, in Firefox this can be accomplished by editing a file called mimeTypes.rdf in your Firefox profile directory, which is usually located in the following directory:
- Unix:
$HOME/.mozilla/firefox/*.default/
- Windows:
/Document and Settings/userid/Application Data/Mozilla/Firefox/Profiles/*.default/
Look for the description of mimetype:text/plain, and add the filename extensions sl and h:
<RDF:Description RDF:about="urn:mimetype:text/plain" NC:value="text/plain">
  <NC:fileExtensions>txt</NC:fileExtensions>
  <NC:fileExtensions>text</NC:fileExtensions>
  <NC:fileExtensions>sl</NC:fileExtensions>
  <NC:fileExtensions>h</NC:fileExtensions>
  <NC:handlerProp RDF:resource="urn:mimetype:handler:text/plain"/>
</RDF:Description>
If all else fails, contact your system administrator for assistance, or tap the wisdom of other users on the RenderMan Forums).
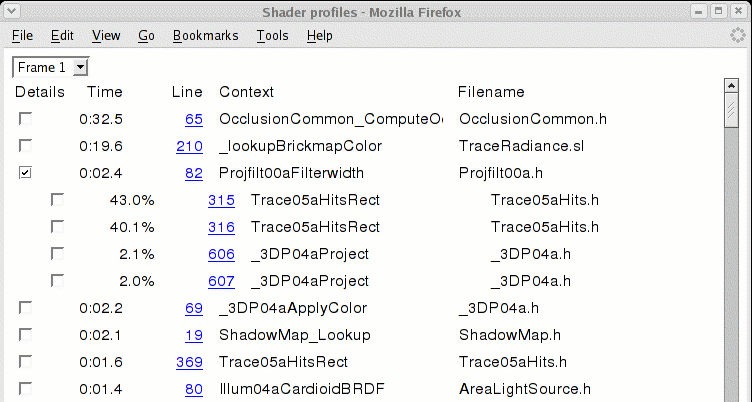
Viewing Hotspot Contexts
If a hotspot is in a function with more than one caller, you might want to know which call site was the most expensive. Simply click on the "Details" checkbox to see the list of callers, along with the percentage contributed by each call site:
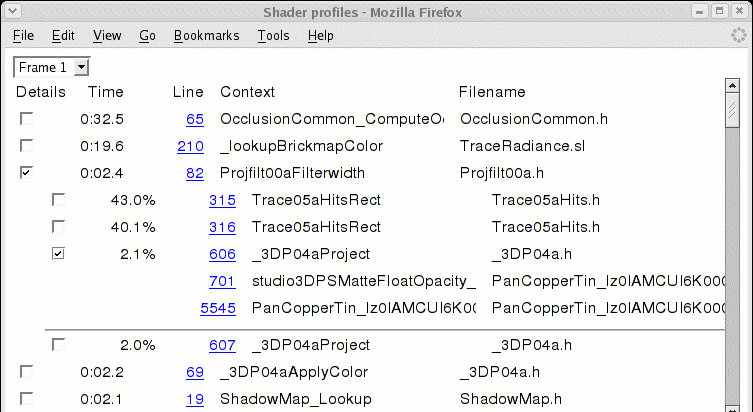
Viewing call stacks
The complete call stack of a hotspot can also be examined by selecting the "Details" checkbox of a particular caller:
Shader 診断
PRMan includes source file and line number information with most shader error messages, as well as (optionally) a complete call stack. This is helpful when diagnosing errors in library routines that are called in many different locations. Call stacks are enabled at debug level two (or higher):
Option "shading" "debug" [2] # Enable extra diagnostics
This feature incurs a slight performance penalty, so it is controlled by a "shading debug level" option. The debug level is set to one by default, which enables source file and line number information in error messages. Call stacks are enabled at debug level two (or higher):
Option "shading" "debug" [2] # Enable extra diagnostics
Uninitialized variable detection is another new feature that is enabled at debug level two. Using uninitialized variables is a common source of artifacts that can be very difficult to diagnose. The results are much more accurate than the current compiler warnings, but there are still some limitations:
- It assumes surface/lightsource/atmosphere calls always succeed, when in fact those can lead to uninitialized variables.
- It cannnot detect partially initialized values, such as matrices or arrays with uninitialized entries.
- Conditional assignments to varying variables can also lead to partially initialized variables that go undetected (i.e. if they're used unconditionally).
- DSO and method arguments are not checked (because they might be output parameters).
- Uninitialized uniform output parameters are not detected yet.
For production renders, we recommend using the default debug level of one. A slight memory savings (a 5-10% reduction in shader definition storage) can be obtained by setting the debug level to zero.
Regardless of the debug level, a warning is now reported if a shader calls lights in a varying conditional context (e.g. in a branch of a varying "if" statement). Doing so is risky because values provided by the surface shader might be incompletely initialized. A warning is also reported if lights are called in a displacement shader or method (or in an opacity method). Doing so has been deprecated because the state of the lights (i.e. their output variables and member variables) is not always preserved between displacement and surface shading.