Special Slim Nodes
Special Slim Nodes
Note
A Slim palette containing the examples discussed below is included with the Tutorial bundle, available online in the Software Download Area. The palette can be found in /your/path/to/rfm_project/slim/palettes/specialNodes.splt.
Step
Step exposes some basic RenderMan シェーディング Language (RSL) functionality. RSL supports functions called step(), smoothstep(), and filterstep(). All of these take an input float value and threshold it between 0 and 1. step() just takes a value and says everything less than this value is 0 and everything more than it is 1. filterstep() does the same thing but antialiases the transition, and smoothstep() allows the user to specify how much of a transition there should be between the values.
Slim's Step node allows you to specify:
- the input,
- the threshold mode - step, smooth step, or filter step,
- what the threshold should be, and
- for the applicable mode, what the softness of the transition should be.
This is really useful when you want to take an input map or procedural and make a mask from it. In the example image below we've used it to mask a shiny GPSurface with a rough bumpy one, showing the effects of the node on a fractal input. You could even take the same input and make two masks with two step nodes, then make a transition color for the blend region between the two materials. It's basically a specialized remap for black and white inputs.
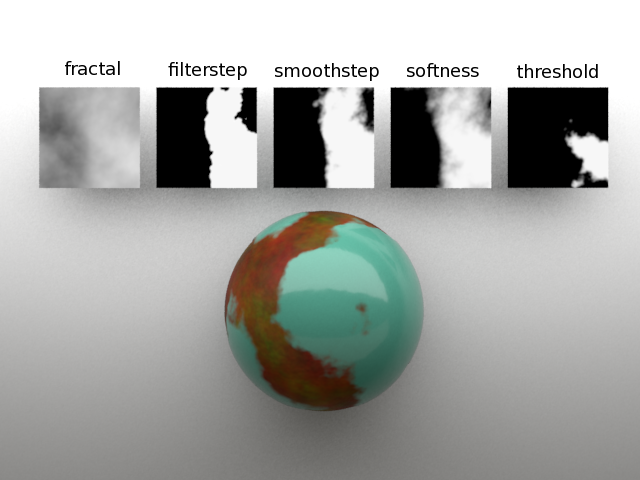
Step in action.
Arbitrary Direction
This node does just what it says - it lets the user provide a direction vector in a specified space, so that it can be connected to something else. It has two parameters, Direction (a Cartesian vector) and Space (the coordinate system in which the vector is defined).
This node can be used, for example, to specify a direction for displacements, or to align an anisotropic shader with the model to which it is attached. The code below is an example of the latter.
#
# generated by slim for Pixar at Tue Apr 16 11:56:47 AM PDT 2013
#
slim 2 appearance slim {
  function 00000mu____xUsMK {
    label GPSurface
    state open
    creator {
      appearanceid 00000mu___VSLsMK
      container {slim internal palette}
      containerid 00004mu___lGKsMK
      filename untitled
      label {untitled 3}
      timestamp 1366138437
      translator slim
    }
    master {$slimShaders/${NAMESPACE}$INSTANCENAME}
    modified 1366138437
    progenitor {template pixar,RMSGPSurface#0}
    properties {
      fields {
        roughness {
          value 0.1326
        }
        anisotropy {
          value 0.8977
        }
        advancedSpecular {
          state open
        }
        tangentSource {
          value 2
        }
        tangentInput {
          provider connection
        }
        Displacement {
          state open
        }
      }
      connections {
        tangentInput {00001mu____xUsMK result}
      }
    }
    dependencies 00001mu____xUsMK
  }
  function 00001mu____xUsMK {
    label FacingDirection
    state open
    master {$slimShaders/tmp/${NAMESPACE}$INSTANCENAME}
    modified 1366138437
    progenitor {template pixar,FacingDirection#0}
    properties {
      fields {
        Abs {
          value 0
        }
        Attenuation {
          value 1.19
        }
      }
      connections {
        Direction {00002mu____xUsMK outdir}
      }
    }
    dependencies {00003mu____xUsMK 00004mu____xUsMK 00005mu____xUsMK 00006mu____xUsMK 00007mu____xUsMK 00008mu____xUsMK 00009mu____xUsMK 0000Amu____xUsMK 0000Bmu____xUsMK 0000Cmu____xUsMK 0000Dmu____xUsMK 0000Emu____xUsMK 0000Fmu____xUsMK 0000Gmu____xUsMK 0000Hmu____xUsMK 00000mu____xUsMK 0000Imu____xUsMK 0000Jmu____xUsMK 0000Kmu____xUsMK 0000Lmu____xUsMK 0000Mmu____xUsMK 0000Nmu____xUsMK 0000Omu____xUsMK 0000Pmu____xUsMK 0000Qmu____xUsMK 0000Rmu____xUsMK 0000Smu____xUsMK 0000Tmu____xUsMK 0000Umu____xUsMK 00002mu____xUsMK 0000Vmu____xUsMK 0000Wmu____xUsMK 0000Xmu____xUsMK 0000Ymu____xUsMK 0000Zmu____xUsMK 0000amu____xUsMK 0000bmu____xUsMK 0000cmu____xUsMK 0000dmu____xUsMK 0000emu____xUsMK 0000fmu____xUsMK 0000gmu____xUsMK 0000hmu____xUsMK 0000imu____xUsMK 0000jmu____xUsMK 0000kmu____xUsMK 0000lmu____xUsMK 0000mmu____xUsMK 0000nmu____xUsMK 0000omu____xUsMK 0000pmu____xUsMK}
  }
  function 00002mu____xUsMK {
    label ArbitraryDirection
    state open
    master {$slimShaders/tmp/${NAMESPACE}$INSTANCENAME}
    modified 1366137060
    progenitor {template pixar,ArbitraryDirection#0}
    properties {
      fields {
        indir {
          value {1.00 0.00 1.00}
        }
        coordsys {
          value object
        }
      }
    }
    dependencies {0000qmu____xUsMK 0000rmu____xUsMK 0000smu____xUsMK 00001mu____xUsMK}
  }
}
Option, Attribute, and PrimVar
There are a collection of nodes in Slim that are designed to provide access to extra data attached in the RIB file. These nodes are the Option, Attribute, and PrimVar nodes. There is one for each parameter that you will want to access.
Options are the global variable of PRMan. There are quite a few built-in options as well as the ability to specify user options. To make a user option, create a world RIBBox and enter:
Option "user" "float enableReflections" 1
You can then use an Option node to access this value. For example, an OptionFloat node with the option name set to "user:enableReflections" can be connected to the Reflection Scale parameter for a GPSurface shader reflections could be toggled on and off using the RIBBox for just those shaders that are looking up the user:option.
Attribute works just the same, but they are relative to the object or hierarchy that they are attached to. You can again do this with a RIBBox containing the following, attached to an object:
Attribute "user" "float enableReflections" 1
Primitive Variables (primvars) refer to data attached to the geometry itself. For example, per-particle data is stored as primvars, which can be accessed by the PrimVar nodes.
Here is an example of per-particle normalized age:
"vertex float ageNormPP" [0.494642 0.490673 0.486223 0.479017 0.472516
                          0.470177 0.459001 0.45464 0.449212 0.446151
                          0.439228 0.43283 0.427178]
You can access this value and feed it into a spline to map the color based on age by creating a PrimVar Float node and setting the Primitive Variable to "ageNormPP". This can then be remapped or processed to produce a color for the shader attached to the particles.
Broadcast and Receive (float, color, vector, point)
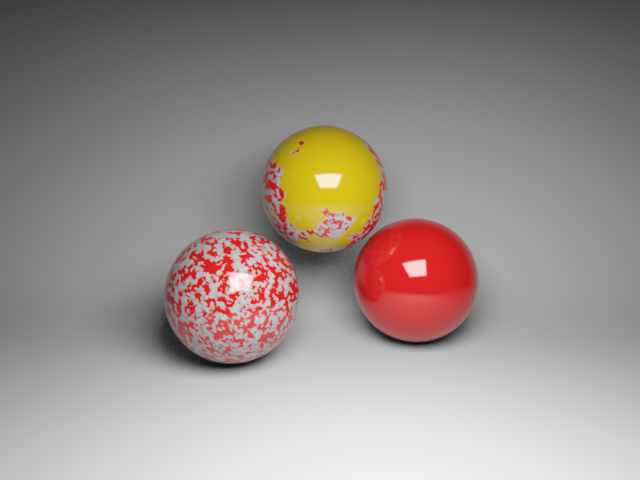
Slim includes matched set of nodes called Broadcast and Receive. Broadcast is a co-shader and Receive is a standard node. They are intended to allow the loose binding of a co-shader color to a color slot on a surface. This is kind of like layering in GPSurface, but lighter weight. Only a single color is being connected, rather than an entire layer, and, unlike with a layer, only the connected attribute changes.
The Broadcast node has a Broadcast Channel parameter that allows you to give it a unique identifier. Receive has a matching parameter via which you specify which channel you want to pay attention to. If you have a color broadcaster it will have a default broadcast channel of "pxslBroadcastカラー", and the receiver looks for the same one. If, on the other hand, you had one color broadcaster that was supposed to override the surface color, you might rename the Broadcast Channel to "broadcastSurfaceカラー" and change the receiver to look for the same category. You could have a second broadcast channel for the specular color.
The additional parameters are Pattern (the data you want to broadcast), and Alpha (the mask you want to use when compositing your pattern onto the base value of the receiver).
Tip
A receiver can receive multiple broadcasters, which will all be composited together using the alpha.
Also, broadcasters can be receivers, too.
In the picture below a GPSurface has been attached to all three spheres. On the left sphere one broadcast color is attached, and on the top sphere, two broadcast co-shaders have been attached.
Note
You can connect multiple co-shaders to a single object, and the layering is based on the ordering of the IDs in the Slim Coshader parameter. If you decide that you want to re-order them, be sure you don't add any spaces between the slim IDs.
This is good: "00004mu___Fb77NK,00000mu___lD37NK"
This is bad: "00004mu___Fb77NK, 00000mu___lD37NK"
Note the offending space after the comma in the second example.
Usage Example
Suppose that you have painted a UDIM/or Mudbox texture atlas to add bullet holes to your character. You could set up your shaders for your model so that they can all receive a broadcast color in the surface color and a broadcast float in the specular gain. Now when you need to apply the map to the model, you can attach a Broadcast node to the root transform of your character and apply the painted maps for specular gain and surface color with its associated alpha channel without having to build a separate shader for both states.