Slim Templates
Writing Slim Templates |
-
Introduction
Writing a Simple Template
The RSL Function
Parameter Definitions
Template Declaration
Template Wrapper
The Complete Template File
Using Your Template
Loading and Testing
Loading Your Template at Startup
Installing Your Template
Dynamic Templates
Dynamic Functions
Accessing Primitive Variables
Dynamic Shaders
Generative Functions
Code Generation Commands
Introduction
Slim uses templates to define the functions that are combined and manipulated in order to create custom shaders. Templates have access to all of the power of RenderMan シェーディング Language, but can present high-level, modular, reusable units that are accessible to programmers and artists alike. Everything from simple patterns and filters to complicated illumination models can be represented using Slim templates.
Templates are only used for custom shader generation. If you have an existing compiled shader and you'd like more control over its interface in Slim, you can define its interface using a companion .slim file to provide parameter descriptions and ranges.
Slim ships with a large number of templates for creating custom shaders, but should you find something missing, you can develop your own templates and add them to the system. It is even possible to take the entire standard set of Slim templates and replace them with a set of your own.
Templates are stored in .slim files. The list of templates loaded into Slim and the specifics of how they are presented in Create Appearance menus are defined inside the initialization files that are read at startup. Templates consist of Tcl commands describing an appearance's user interface and a block of RenderMan シェーディング Language (RSL) which describes its contribution to the shader.
We won't discuss specifics of RSL or Tcl here. Suffice it to say that working knowledge of RSL is required to create useful Slim templates. As you will see, the amount of Tcl knowledge required depends on the complexity of the template being created.
Writing a Simple Template
To demonstrate how to write a template, we're going to create a simple template for performing a smoothstep operation. For the purposes of illustration, we're actually going to go inside-out. We'll start with the core of a template, the RSL code, and introduce each of the layers that wrap this code into a template, and then into a .slim file.
The RSL Function
First, here is the RSL portion of our smoothstep template:
void
pxslSmoothstep(float input, minVal, maxVal, scl;
               output float result;)
{
    /* calculate the standard smoothstep */
    result = scl * smoothstep(minVal, maxVal, input);
}
Here are some key things to notice:
- This is standard RSL syntax, comments and all. There are no special characters or strings, just a definition of a function.
- The function does not return the result of the smoothstep, but instead sets an output variable. This will always be the case, especially when setting multiple result variables.
- The name of the RSL function contains a special prefix: pxsl. We'll return to how this prefix is used later on.
Parameter Definitions
Next, we'll list the parameters of this function and provide more information about them for the sake of user interface. These parameters are defined using Tcl syntax:
parameter float Input {
    description {
        Pattern to feed through smoothstep
    }
    detail mustvary
    default s
}
parameter float MinVal {
    label "Min Value"
    description {
        Threshold below which the function will return 0
    }
    default .2
    range {0 1 .001}
}
parameter float MaxVal {
    label "Max Value"
    description {
        Threshold above which the function will return 1
    }

    default .8
    range {0 1 .001}
}
parameter float Scale {
    description {
        Scale to apply to the result
    }
    detail varying
    default 1
}
parameter float result {
    access output
    display hidden
}
Before analyzing the specifics of each parameter's declaration, some
comments about the parameter declaration:
- These parameters are used when calling your RSL function. You must declare a parameter for every parameter of your function, and the order of these parameters must correspond to the order of parameters in your RSL function.
- The names of these parameters must resemble variable names (i.e. no spaces, punctuation, etc.). To define a more user-friendly string, you can use the label keyword. Note that in this case, it is not necessary for the names declared here to match the names of parameters in your RSL function (though it is certainly recommended).
parameter, which takes the form:
parameter type name body
type and name ("float" and "Input" in the first
parameter) are the most important arguments. What follows is a list of
key/value pairs with specific details about the parameters. Because this
is Tcl, it is common to list these details on consecutive lines (as the {}
syntax allows one to do). The key-value pairs can be listed in any order,
though as with anything else, staying consistent is appreciated by your
fellow developers.
Let's examine some of the keywords listed above:
- access acc
- Access refers to whether the parameter is an input or output parameter of the RSL function. Input is the default, so this is only necessary when declaring an output parameter. Note that even though the output parameter result is not visible by the user, it still needs to be declared. Neglecting to include output parameter(s) or to properly label their access can result in problems with insufficient variables in the resulting shader.
- default def
- The default value for the parameter. Remember that this is Tcl syntax, so when providing default values for a color, use a list, e.g. default {1 1 1}.
- description desc
- This information will be used to create the info "balloon" that the user sees when pressing the i button. You can use curly braces to make your description span severl lines. Don't worry about whitespace; it will be compressed.
- detail d
- By default parameters are uniform, which means their value cannot be provided by another appearance. You can use detail to specify a parameter as varying, and thus connectable. In the case above, we've specified that Input is detail mustvary, meaning the value can only be provided by another appearance.
- display d
- The visibility of the parameter. You can use display hidden to make a parameter hidden, which is usually necessary for output parameters.
- range r
- The range specifies the minimum and maximum values of the parameter, and optionally, the precision. The default range is {0 1 .01}. You can also specify a parameter as unbound, e.g. {0 unbound .0001}.
Template Declaration
The appearance parameters and shading language code are declared inside of a template. Our template declaration will look something like the following. Note that for the sake of brevity in this demonstration, we have skipped the parameter definitions and use a placeholder.
template float Smoothstep {
    description {
        0 if input < minVal; 1 if input >= maxVal; otherwise, a
        smooth Hermite interpolation between 0 and 1.
    }

    template parameters

    RSLSource StaticFunction {
	void
	pxslSmoothstep(float input, minVal, maxVal, scl;
	                output float result;)
	{
	    /* calculate the standard smoothstep */
	    result = scl * smoothstep(minVal, maxVal, input);
	}
    }
}
template is a proc which takes the form:
template type name body
We've named this template "Smoothstep." The name used here must match the suffix of the function declared within the RSL source. We've also added a description. This will be visible to users inside of the Appearance Editor.
Our shading language is enclosed within a call to RSLSource, and we've declared our code to be a StaticFunction. This is the simplest type of RSLSource, as its contents are simply a block of RSL code.
Template Wrapper
The outer-most piece to your template file wraps your templates up by author and vendor information. You can use this to distinguish between the factory templates that ship with Slim and the templates you develop. The wrapper looks something like the following:
slim 1 extensions author {
    extensions vendor prefix {

        template(s)

    }
}
The fields are defined as follows:
- author
- The author of the template. This is basically for documentation purposes, and is not used at all by Slim.
- vendor
- The vendor is used to define a namespace for your template in Slim, the full description of which is vendor,template-name#template-version.
- prefix
- The prefix acts as a namespace for the shading language functions that are generated by your template, the names of which are the simple concatenation of the prefix and the template name.
Below is an example of the standard template wrapper found in factory templates:
slim 1 extensions pixardb {
    extensions pixar pxsl {


    }
}
Were we to define our Smoothstep template, within this wrapper, its full identifier would be:
pixar,Smoothstep#0
whereas the shading language function generated by this template would be:
pxslSmoothstep
Note that this is the name that we used in our RSLSource block above.
The Complete Template File
Below is the complete template file. You can also find this file here.
##
##  Smoothstep.slim
##  Implements the shading language smoothstep function
##

slim 1 extensions pixartt {
    extensions pixar pxsl {
        template float Smoothstep {
            description {
		0 if input < minVal; 1 if input >= maxVal; otherwise, a
		smooth Hermite interpolattion between 0 and 1.
	    }
	    parameter float Input {
		detail mustvary
		description {
		    Pattern to feed through smoothstep
		}
		default s
	    }
	    parameter float MinVal {
                label "Min Value"
		description {
		    Threshold below which the function will return 0
		}
		default .2
		range {0 1 .001}
		subtype slider
	    }
	    parameter float MaxVal {
		label "Max Value"
		description {
		    Threshold above which the function will return 1
		}
		default .8
		range {0 1 .001}
		subtype slider
	    }
	    parameter float Scale {
		description {
		    Scale to apply to the result
		}
		detail varying
		default 1
	    }
	    parameter float result {
		access output
		display hidden
	    }
	    RSLSource StaticFunction {
		void
		pxslSmoothstep(float input, minVal, maxVal, scl;
				output float result;)
		{
		    /* calculate the standard smoothstep */
		    result = scl * smoothstep(minVal, maxVal, input);
		}
	    }
        }
    }
}
Default Connections
A note about default connections — when a parameter is declared detail mustvary you can also supply a default connection, e.g. detail mustvary "pixar,SurfaceNormal". These default connections are different from standard connections because they are not actually instanced in the palette. As in the aforementioned example, when the sl is generated for the template, the function for SurfaceNormal will only be invoked one time, regardless of how many default connections are using it. This has a couple of benefits:
- You can avoid normalizing the same values over and over, as you would have to do if you referenced the global N in your templates.
- It allows a convenient entry point in your template to override the normal, or other global that would typically be accessed in your template.
We can see these benefits if we consider the Specular shading component. In this template, the normal is provided by a default connection to "pixar,シェーディングNormal". If you are using the Diffuse shading component, both of these use the same normalized N. Because the normal that is used for lighting for this template is exposed as a parameter to the shader instead of using the global N, it is easy for the user to connect another normal template to the Normal parameter, allowing the user to do something like connecting the "NormalMap" template to the Normal parameter. Had the normal not been exposed to the user, a displacement shader would have been necessary to bump the normal, but without the flexibility of using a different normal for the Diffuse shading component's lighting.
To sum up, using default connections lets you easily share parameters between templates, and allows you to efficiently expose additional parameters to the user, which would be difficult to express without using default connections.
Using Your Template
Loading and Testing
The quickest way to load your template into Slim for the sake of debugging is to use Slim's scripting environment. Assuming you've saved smoothstep.slim in the current working directory, you can read it into slim with the following command:
This reads the commands in the specified slim file, which in this case houses your template. Any errors encountered when parsing the .slim file will be directed to the Message Log.slim ReadSlimFile smoothstep.slim
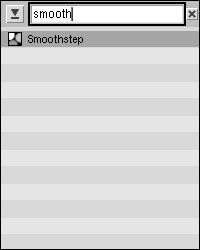
You can create an appearance based on your template by finding it in the Create mode (pressing the + button in the Palette Listing Controls section) or using the kreator window (invoked via the k keyboard shortcut) as shown in the image below:
Create an appearance using your Smoothstep template, then bring it up in the Appearance Editor. It should look something like the following:
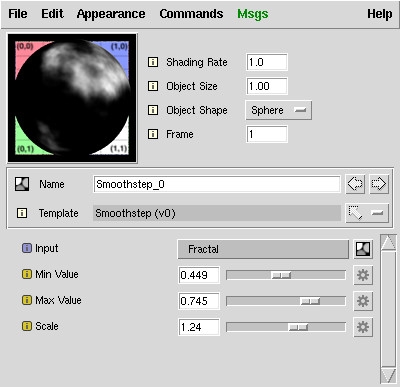
In this example, we've adjusted the sliders to make sure they function properly, and connected a Fractal as input to test how our template can be used to filter a pattern. As you can see from the preview swatch, the template works fine.
If you aren't as lucky, you will find errors from the shader compiler in the Message Log. Change your template to fix the errors, and use the File : Reload Template command to reload your template and try again.
You can also use the Reload Template command to update your appearance with any changes that you make to the template. Reloading a template will update the settings for parameters in an appearance, though parameter values that have been set by the user will be preserved (you can update these too by reverting parameters to their default values).
Loading Your Template at Startup
Obviously, entering the Slim console to read your Slim file is not something you or your users will want to do when they want to use your template. Instead, you'll want to tell Slim to load your template at startup and to place it in its Create Appearance menus.
You'll do this by editing one of Slim's initialization files. For the sake of testing, the easiest ini file to work with is your personal slim.ini file, located at $HOME/.pixarPrefs/RenderMan_Studio/<Version>/slim.ini. If this file is not already present, go ahead and create it.
You'll first want to tell Slim the directory, or search path, that contains your template. If, for example, you've stored your smoothstep.slim file in a subdirectory off of your home directory called slimdev, you will want to add this directory to the template search path by adding the following to your slim.ini:set tSearchPath [file join [GetEnv HOME] slimdev] set paths [GetPref TemplateSearchPaths] lappend paths $tSearchPath SetPref TemplateSearchPaths $paths
Next, you'll want to tell Slim to load your template. The best way to load your template is to take advantage of Slim's lazy template loading mechanism. This system allows templates to be loaded only as they are needed, which means Slim is quick to start regardless of the number of templates that you add. With lazy template loading, you register your template by giving Slim enough information to place it in its Create Appearance menus and to find the actual template file when its needed.
The factory slim.ini file ships with a procedure to help you with this step, as demonstrated below:
::Slim::RegisterLazyTemplates {
    smoothstep.slim {
        { pixar,Smoothstep#0  float  Smoothstep  /Float/ユーティリティ }
    }
}
RegisterLazyTemplates expects a list of slim files containing templates and
details about the templates inside. The details consist of four vital pieces
of information:
- The template identifier (pixar,Smoothstep#0)
- The return type of the template (float)
- The way the template should be presented in the Slim UI (Smoothstep)
- Where the template should be placed in the Create Appearance menus (/Float/ユーティリティ)
The lazy-loading is the best method for loading a Slim template. If for some reason, however, it is necessary to load your template immediately at startup, you can do so using the LoadExtension initialization command directly. This is common for files containing customui information, tcl macros, or templates not normally seen by the user. For example:
Note that in this case, we're required to fully specify the path to the .slim file (which we're doing via the file join command).LoadExtension slim [file join [GetEnv HOME] slimdev conversion.slim] slim
Installing Your Template
Once a template is polished and ready for general consumption, you'll likely want to install it someplace other than your home directory.
Though it might be tempting, we recommend that you not place it inside of the slim installation location or register it using the factory slim.ini. Doing so will make the process of installing new versions of Slim much more complicated, and you risk accidentally deleting your template.
Instead we recommend a common directory for all of the extensions you add to Slim. You can tell Slim (and other RenderMan Studio applications) about this directory using the $RMS_SCRIPT_PATHS environment variable. For example, you might store all of your extensions in a directory like:To tell Slim (and RfM, Tractor, etc) about this directory, you would:/share/pixar/extensions
% setenv RMS_SCRIPT_PATHS /share/pixar/extensions
Slim will look for a file called slim.ini file in this directory. Use this file to list any extensions (scripts, templates, etc.) you wish to be loaded by Slim. You might want to place your templates in a subdirectory, like:
Transfer your template to the subdirectory, and then copy the code from your personal .ini file to the shared .ini file. Note that the only change required is the declaration of the template search path:/share/pixar/extensions/slim/templates
set tSearchPath /share/pixar/extensions/slim/templates

set paths [GetPref TemplateSearchPaths]
lappend paths $tSearchPath
SetPref TemplateSearchPaths $paths

::Slim::RegisterLazyTemplates {
    smoothstep.slim {
        { pixar,Smoothstep#0  float  Smoothstep  /Float/ユーティリティ }
    }
}
With the template and .ini files in place. Any user that sets RMS_SCRIPT_PATHS above will load the template you've installed. More information about initialization files is available here.
Dynamic Templates
For most applications, declaring the RSL for a template as a static block will suffice. As you have seen, it is relatively straightforward to do. There are situations, however, where you will demand more power and flexibility. For these situations, you can take a more active role in code generation with the various flavors of dynamic templates.
Dynamic Functions
The Smoothstep template above is actually quite specific. It might make a more useful template if the user were able to select what operation were performed on its three input arguments via a property. Here is the declaration for a slimattribute that would provide the user with a choice of functions:
slimattribute string Operation {
    description "Operation to perform on input"
    subtype selector
    range {
    	Clamp clamp
    	Remap remap
    	Smoothstep smoothstep
    }
    default smoothstep
}
Before we discuss how to use the new slimattribute, here are some definitions
for what you may not recognize:
- slimattribute
- A slimattribute is different from a parameter. Unlike a parameter it cannot be set to internal or external, and it cannot be connected to another function. It isn't used to communicate with RfM (as a torattribute is) or influence RIB generation (as a rib attribute is). It is only useful from the context of the appearance. This makes it useful for controlling code generation.
- subtype selector
- Without this declaration, the user would be presented with a text entry field. By declaring a subtype, we give Slim more information about how to present the property to the user. In this case, we've specified selector, which means the user will select from a predefined list of options.
- range ...
- We've used range before to specify the minimum and maximum values for sliders. Here we're using it to specify the options to present to the user. The range consist of a list of pairs of labels (which are presented to the user) and values (which are used internally).
To use this slimattribute, we will have to change how we declare the RSL portion of our template. Rather than declaring it as a static block, we will use Tcl to output each line of our function. In doing so, our StaticFunction will become a DynamicFunction
DynamicFunction templates are specified by declaring two local procedures that will be executed when Slim generates your shader. The basic structure looks like:
RSLSource DynamicFunction {
    proc primvars {} {
        ...
    }
    proc function {} {
        ...
    }
}
The first procedure, primvars, will be executed within the parameter block
of the shader. The second procedure, function, will be executed when declaring
the function in the shader.
Inside of each statements you will write a series of output statements
containing your shading language.
Were we to rewrite our Smoothstep template using a DynamicFunction, the result
might look something like:
RSLSource DynamicFunction {
    proc primvars {} {
    }
    proc function {} {
        generateBody {
            output "/* calculate the standard smoothstep */"
            output "result = Scale * smoothstep(MinVal, MaxVal, Input);"
        }
    }
}
The generateBody procedure declares the function for you, so all you have to do is compose the body of the function. Note that when using generateBody, your parameter names must exactly match.
So far, this isn't very interesting, because we're not doing anything very dynamic with our DynamicFunction. So let's incorporate the Operation slimattribute:
RSLSource DynamicFunction {
    proc primvars {} {
    }
    proc function {} {
        generateBody {
            switch [getval Operation] {
                clamp {
                    output "/* clamp */"
                    output "result = Scale * clamp(Input, MinVal, MaxVal);"
                }
                remap {
                    output "/* remap */"
                    output "result = Scale * (MinVal + Input * (MaxVal-MinVal));"
                }
                smoothstep {
                    output "/* smoothstep */"
                    output "result = Scale * smoothstep(MinVal, MaxVal, Input);"
                }
                default {
               	    output "/* unrecognized Operation: [getval Operation] */"
                    output "result = 0;"
                }
            }
        }
    }
}
Here we use the getval procedure to query the value of our slimattribute. Then, we output the proper bit of RSL based on the value of Operation. This is why we've used a slimattribute rather than a parameter. By using a slimattribute, we guarantee that the value is constant, so it's suitable for directing our code generation.
By using a DynamicFunction, we've made our Smoothstep template a lot more useful. And because we're making decisions about which function to execute at code-generation time (versus render time), the resulting shader remains efficient.
Here is the complete file containing the new template, which we've christened with the more general name of "Filter." If you'd like, you can copy the file, read it into Slim, and try it out. Appearances created using this template should appear something like the following:
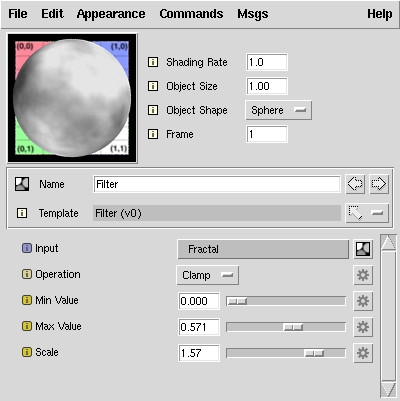
To see the effect of using a DynamicFunction, change the value of Operation, and view the resulting shader using File : View SL Source (be sure Expert Menus are turned on). You'll see that everytime you change the Operation, the body of your function will change.
Accessing Primitive Variables
The example above had an empty delcaration of the primvars procedure. This procedure is useful when you want to declare additional parameters of your shader that are set by the geometry of your scene. Here is a template that allows you to declare an additional shader parameter from within a function:
template float PrimVarFloat {
    label PrimVar
    slimattribute string name {
        label "Primitive Variable"
        description {
            Enter the name of your float primitive variable here.
            Note that this cannot be an expression.
        }
        default {}
    }
    parameter float Multiplier {
        description {
            A multiplier for the underlying vertex variable.
        }
        default 1
        detail varying
    }
    parameter float result {
        detail varying
        access output
        display hidden
    }
    RSLSource DynamicFunction {
     	# in primvars, we declare our primitive
     	# variable based on the name entered by the user.
     	proc primvars {} {
            set nm [getval name]
            if {$nm != ""} {
                declare output varying float $nm 0
            }
     	}
     	# in function, we generate the code.
     	proc function {} {
            generateBody {
             	set varnm [getval name]
             	if {$varnm == {}} {
                    output "/* no name entered for primitive variable */"
                    output "result = Multiplier;"
             	} else {
                    # be sure to extern the variable
                    output "extern float $varnm;"
                    output "result = Multiplier*$varnm;"
             	}
            }
     	}
    }
}
Note that we've declared our primvar using the declare keyword.
Note that it is possible to access a defined primitive variable from a StaticFunction by declaring a parameter to have provider primitive. This template provides access to the AgeNormPP variable, a variable automatically attached to Maya particle systems by RfM:
template float AgeNormPP {
    description {
	Access to the vertex variable associated
	with Maya particle systems. This value ranges from
	0 to 1.
    }
    parameter float multiplier {
	description {
	    A multiplier for the underlying vertex
	    variable.
	}
	default 1
    }
    parameter float ageNormPP {
	display hidden
	provider primitive
	detail varying
	default 0
    }
    parameter float result {
	access output
	display hidden
    }
    RSLSource StaticFunction {
	void
	pxslAgeNormPP(float mult; output float result;)
	{
	    extern float ageNormPP;
	    result = mult * ageNormPP;
	}
    }
}
Dynamic Shaders
The example templates above both produce RSL functions that are inserted into the shader. If you've ever written an RSL shader, though, you know that at some point, the shader will need to set Ci (or Cl). DynamicShader templates provide the main body of the shader that triggers all of the function calls and sets what variables are necessary for the shader to take effect. It is for this reason that DynamicShaders are often declared as RSLMain.
As an example of an extremely simple DynamicShader template, here is the source for an Ambient light template:
template light Ambient {
    lighttype ambient
    parameter color Ambientカラー {
	description {
	    The color of your the light. You
	    can connect a pattern generator here or
	    simply use a constant color.  Two common choices
	    are an image map or a spline which varies with
	    distance.
	}
	detail varying
	default {1 1 1}
    }
    RSLSource DynamicShader {
	output "extern point Ps;"
	output "L = vector(0,0,0);"
	generate
	output "Cl = [getvar Ambientカラー];"
    }
}
Some things to notice about this template:
- The type of template is light. DynamicShaders can only be declared for the four canonical types of RenderMan shaders: surface, displacement, light, and volume.
- A lighttype has been declared. This is necessary for light templates. Valid lighttypes are ambient, point, distant, spot, and environment.
- There is no generateBody call. This code will be in the main body of the shader, not in a function, so a function wrapper is not necessary.
- There is a generate call. This triggers the execution of functions in the function graph.
- The getvar procedure is used. Since this code will not be inside of a function call, we don't know what the name of the variable containing the value of Ambientカラー will be. Most likely, it will be a temporary variable used for the result of the function connected to Ambientカラー. You must always use getvar to refer to your parameters in a DynamicShader.
Generative Functions
View the source of a simple shader generated by Slim and you will see that there is a relatively simple flow of data. The flow is actually a graph, not unlike what is visible in Slim's graph editor. Leaf appearances like manifolds are the first functions to be executed. The results of these functions are used by pattern generators. These results, in turn, are used by illumination functions, which eventually flow to the root function of the graph.
Most of the time, this sort of data flow works very well. It means that no function is ever needlessly executed multiple times. If multiple appearances connect to the same function, that function will only be executed once. There are times, however, when you may find you need more control over the execution of functions. The following RSLSource from a template that switches between two inputs provides us with an example situation:
RSLSource StaticFunction {
    void
    pxslSwitch( float input0, input1, which;
                output float result; )
    {
        if (which > 0.5)
            result = input1;
        else
            result = input0;
    }
}
This template takes two input parameters, and based on the which parameter, selects one of them. This might allow a user to choose between two different patterns that are fed into the function.
When considering the way that data flows in a slim shader, however, you may come to this realization: you will often be calculating something that will never be used. If input0 is connected to a function that ray-traces, but which is set to 1, all of that computation has been wasted.
In these situations, you would like more control over the generation of the shader. Rather than relying on the input functions being computed before our function is called, we wish to choose which function is called. It is in these situations that we can use a GenerativeFunction.
GenerativeFunctions are like DynamicFunctions, except inside them you can use the generate command on a specific parameter. This, for example is a version of the Switch template written using a GenerativeFunction:
RSLSource GenerativeFunction {
    proc primvars {} {}
    proc function {} {
        generateBody {
            output "if (Which > 0.5)"
            output "{"
            indent
            set var1 [generate Input1]
            output "result = $var1;"
            exdent
            output "}"
            output "else"
            output "{"
            indent
            set var0 [generate Input0]
            output "result = $var0;"
            exdent
            output "}"
        }
    }
}
When the shader is generated, the generate commands will expand into calls to the functions connected to Input0 and Input1. To see how this works, you can test the simple Switch template in switch.slim. Connect functions to each input and then view the resulting shader. You'll see that the function calls are actually quite complicated. Slim is keeping track of which functions are called so that if the result of any function is used by more than one node, the function doesn't get executed twice.
To see a more complicated example of a GenerativeFunction in action, view the source for the LayerUltimo (aka "Layer (fast)") template.
Code Generation Commands
- connected paramname
useful to determine whether a parameter obtains its results from another function. returns 1 if paramname is connected, 0 otherwise.
- declare access detail type name value
allows you to declare primitive variables.
only valid within the primvars procedure of Dynamic and Generative functions
- define expression
inserts a #define in the shader with the given expression
- exdent
decreases the indentation level for output commands (it's the opposite of indent).
- generate args
invokes Slim's code generator which causes the creation of temporary variables and the invocation of all connected functions. When specified with no arguments, the entire call graph will be emitted. When specified with a list of parameter names, only those portions of the call graph associated with the named parameters will be emmited. Note that generate supports the use of wild cards (glob expressions) as filters in the parameter list, with the following three exceptions:
- -- — all the subsequent arguments are treated literally and exact match is forced.
- - — is used to specify arguments to explicitly exclude.
- ***: (with the optional leading "-") — the argument is interpreted as a regular expression and regexp matching is used instead of wild cards (glob).
only valid within a GenerativeFunction or DynamicShader
- generateBody body
used within the function procedure of a DynamicFunction or GenerativeFunction, generates the function parameter list. Enclose your code generation logic within the body.
- getFunctionName
used within the function procedure of a DynamicFunction, returns a unique name for a DynamicFunction. only necessary if declaring the function parameter list manually.
- getproperties args
returns a list of property names that match the criteria set forth in the option list. Most commonly used as
getproperties -name patternOther criteria correspond to those used in the GetProperties method.- getpropertyinfo paramname args
returns information about paramname as specified by additional arguments:
- default
- The default value of paramname
- detail
- The detail of paramname
- label
- The label of paramname
- provider
- The value provider for paramname. Return value is one of: constant (internal), variable (external), expression, or connection.
- type
- The type of paramname
- userdata key
- User data for paramname specified by key
- getvar paramname
returns and RSL representation of paramname. Depending on the connectivity of the parameter, this may result in a reference to a temporary variable, a local constant or the name of a formal shader parameter.
- getval paramname
returns the current value of the paramname. Note: this only is accurate for properties with constant values. Parameters with values provided by an external value or by a connection may have a different value at run time than they do at code generation time.
- indent
increases the indentation level for output commands.
- include file
adds file for inclusion (via #include) at compile time. The following options are supported:
- -verbatim
- copies all the arguments directly to the generated .sl
- -within location
- copies the arguments from the specified location to the generated .sl. Values for location are "preamble", "parameters" and "body".
- logmsg level message
Print a message to Slim's log at a specificied level. The level argument can be one of DEBUG COPIOUS NOTICE WARNING ERROR. e.g.
logmsg WARNING "value of a is $a"- output str
places str into the output stream of the code generator.
- safeeval expression
Code generation executes in a limited tcl interpreter that is separate from the safe interpreter used by the Slim scripting environment. You can use safeeval to execute a command in the main safe interpreter. Use %c in your expression and it will be replaced by the current function, e.g.
set functionName [safeeval %c GetLabel]